 |
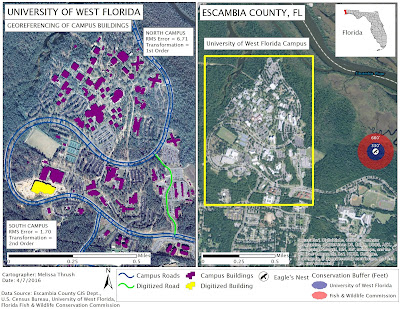
| MAP1: Georeferenced Buildings On And Eagle's Nest Near UWF's Campus |
Difficult to believe this is our final lab assignment for GIS4043! This week's lab was primarily focused on Georeferencing. Georeferencing is used to align an unreferenced aerial photograph with an already referenced control layer. In Section 1, we were provided two unreferenced aerial photographs of UWF's campus, uwf_n.jpg and uwf_s1.jpg representing the northern and southern parts of the main campus. Our two referenced layers were a campus roads layer (UWF_roads) and a campus buildings layer (Buildings). We then worked on referencing the North Campus layer using the Add Control Points tool to identify 10 common points on the
target layer and on the already referenced control layer. I went through this process a few times before I learned that the key was zooming and trying to select as close to the exact same spot on the unreferenced layer and the referenced layer. Using the View Links Table we could see our Root Mean Squared (RMS) Error value which had to be less than 15. I selected 10 common points using a 1st order transformation and a RMS Error of 6.71. These 10 points then allowed us to "Update" georeferencing and provide a spatial reference for the North Campus layer (uwf_n.jpg). It took me a few trials to get more proficient at adding control points with accuracy. The second part of Section 1 of the lab had us georeference the southern part of the campus. After we used 1st order transformation to create at least 6 common links we then changed the transformation to 2nd order. After creating 10 common links we could change the transformation to 3rd order. Higher transformation orders allow the raster image to "bend and warp" more. Ideally you want to select the transformation order that presents your image most accurately. I chose to use a 2nd order transformation and had a RMS Error of 1.70.
In Section 2 of the lab we learned how to use the Editing Tool to create new features in our map. Using this tool and some basic editing techniques we created a new building in our Buildings layer and added a new road to our UWF_roads layer. I am glad we learned how to use this tool as it definitely appears to be one that will come in handy.
In Section 3 we learned how to use the Multi-ring buffer tool to create two separate buffer zones around a located eagle's nest but have the buffer zones appear together as one feature. We even learned how to add a hyperlink that displayed a photograph of the actual eagle's nest!
In Section 4 we used ArcScene to create a 3D image of the UWF Campus. We used a DEM from Labins.org to create a "relief" for the other layers (Buildings, UWF_roads, and the aerial photographs of northern campus and southern campus) via the Base Height tab. We used the extrude tool to extrude the campus buildings on the map. Because the image still appeared "flat" we applied vertical exaggeration to the Scene to make it appear more three dimensional.
This lab was intensive but covered several important tools and techniques that I am sure to encounter again.
 |
| MAP2: UWF Campus Image Created In ArcScene Using a DEM |


JOHNN'S CASINO IN SEAH OLYMPUS CITY - Air Jordan
ReplyDeleteJOHNN'S air jordan 18 retro men on sale CASINO IN SEAH OLYMPUS how to find air jordan 18 retro men red CITY JOHNN'S CASINO IN SEAH OLYMPUS CITY JOHNN'S CASINO bestest air jordan 18 retro men IN SEAH OLYMPUS 포커 용어 CITY JOHNN'S CASINO IN SEAH OLYMPUS CITY | JOHNN'S where to buy air jordan 18 retro red